Lender ordering is a multi-faceted feature which allows you to -
- Switch lenders on or off from showing on your lender send screen
- Order your lenders
- Set different orders by branch/dealership
- Limit the number of lenders which show to enforce a prescribed order
- Setup the unlocking of the prescribed ordering of lenders
Prerequisites for this feature
- If you have a multi-account hierarchy this needs to be done at the master level.
Ordering
In its simplest form you can order your lenders and switch them on or off.
Navigate to - Settings > Lender > Ordering
If this is the first time you’ve been to this section you will need to setup your first ordering group. Click Add at the top right, enter the name of the ordering group and press Save. If the AutoConvert team have done this for you we will have probably called this “Default” but it really doesn’t matter, you can edit this as well as you get familiar with this and your requirements evolve.
The below video shows the basic way you can edit one of your lender orders and how you can enable/disable a lender. The drag and drop functionality is done by pressing and holding on the lender you want to move and dragging it to the new position.
If you have multi-account hierarchy with a dealerships/branches setup and need a different order for each then you can use the same area to set all of this up. Remember you need to do this at the master level. You will see the Application strategy where you can select –
- Apply to all sub-accounts - all sub accounts will use this order if you select this
- Apply to specified sub-accounts – selecting this will display an additional area on the user interface which allows you to select the dealerships/branches you’d like this order to apply to.
- Exclude specified sub-accounts – used as the opposite to the above and just gives another option.
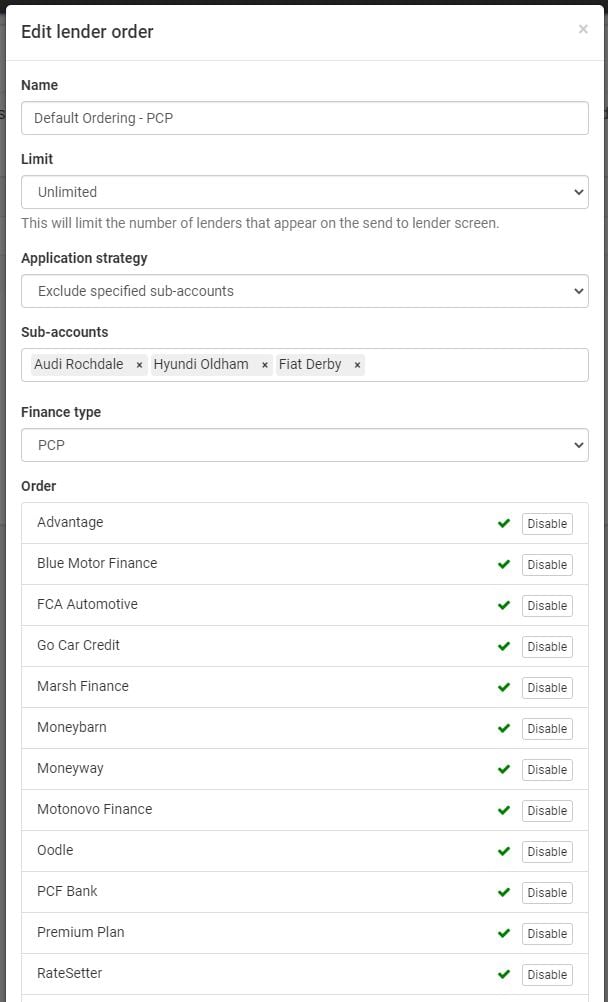
Limiting Lenders
Limiting the number of lenders (seen above is currently set at Unlimited) gives you the ability to enforce a prescribed order. As an example, if you had this set to 1 with 5 lenders in your lending panel then when ones of your sales executives navigated to the send to lender section they’d only see the 1st possible lender from the ordering you’ve set.
The system intelligently moves onto the next lender where required so taking the above example if lender filters meant that your 1st lender didn’t breached some of the lender filters you had in place but the 2nd lender didn’t it would show the 2nd lender.
In a similar vein, after you sent to a lender if it declines then the next possible lender would show.
Unlocking
Unlocking us used in conjunction with the limiting and ordering of lenders. You can use this if you’d like your sales executives to be able to skip over the prescribed ordering. When you have locking in place your sales executives request unlocks by using the actions menu item and selecting “Request unlock”.
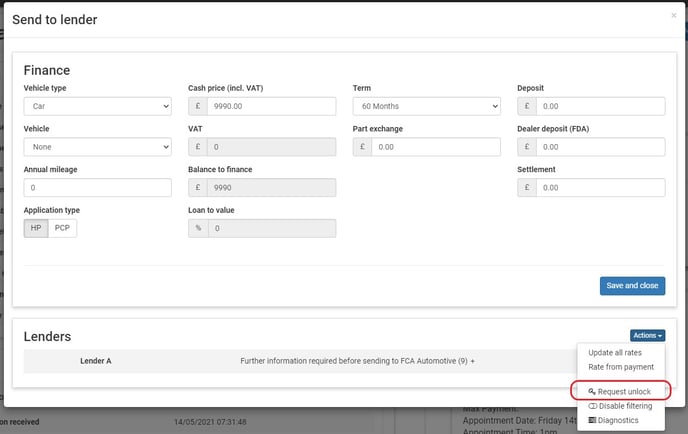
This pops up a box where the sales executive would enter why they are requesting an unlock request rather than sending to this lender.
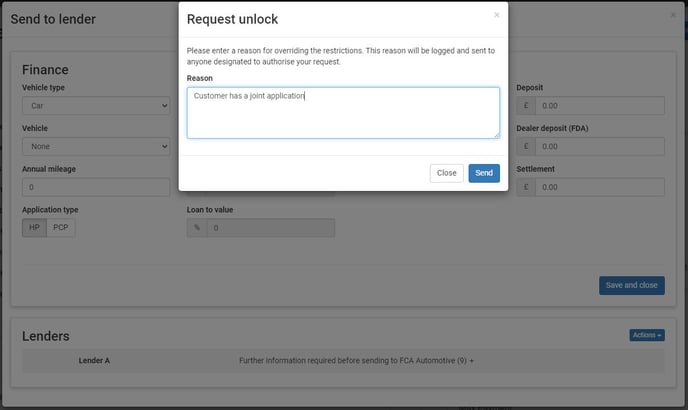
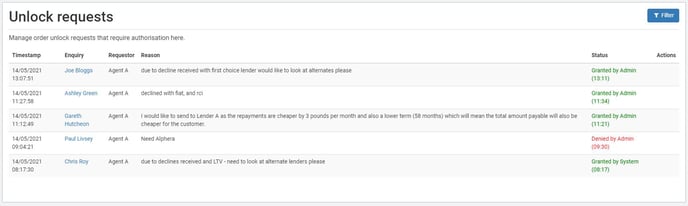
Upon completing this your business managers or any user or custom role group of users which have “Can authorise unlock requests” setting enabled will see these unlock requests under Settings > Lender > Unlock as below. Further to this, any one setup to receive these unlock requests via email can also quickly link to Accept or Deny these requests directly from emails they’ll receive. We explain how to set this up later in this knowledge base.
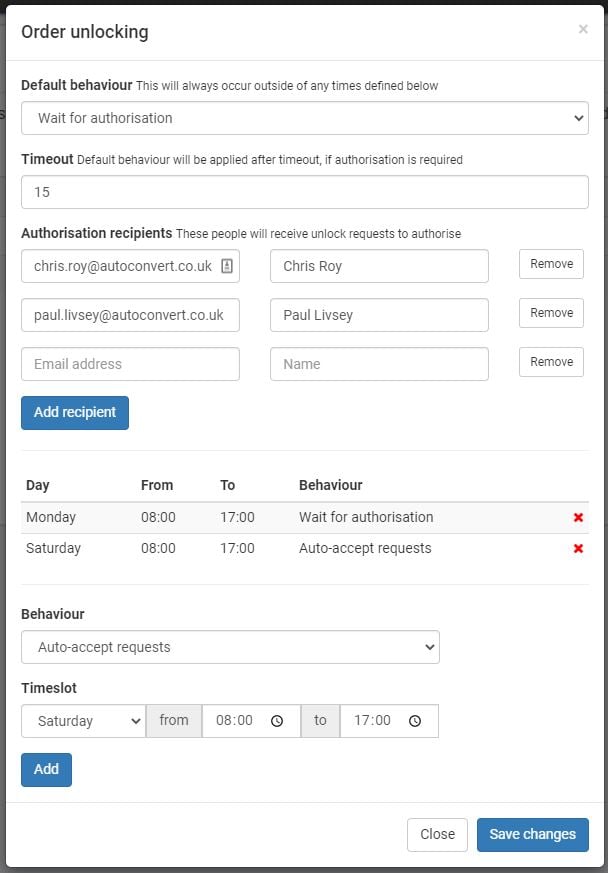
Setting up unlocking can be done from “Lender ordering” so navigate to - Settings > Lender > Ordering. You setup unlocking by each of the orders you have. In the example below you can see we’ve only got one default order. To access the setting for the Unlocking you’d click the button we’re pointing at.
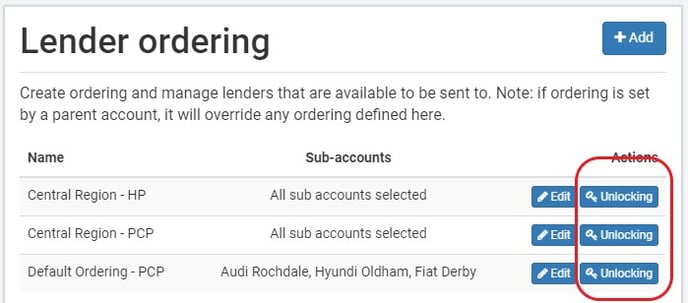
Clicking this will load the unlocking settings.
We’ve currently got this setup with a strategy which will wait for business manager signoff during office hours but, so the lending process isn’t held up we’ll accept these requests if the business manager doesn’t accept/deny after 15 minutes.
You can see there is an email address setup to receive an email when a request is made. You can setup as many emails as you want, you just need to make sure that the person receiving these emails has the “Can authorise unlock requests” custom role enabled.